
Have any questions?
Call us:
We reply on all questions within
Mon - Fri 8:00am - 5:00pm (CST)
Getting Started
Download Extension for VTiger
First step is to download VTiger Extension. The extension can be downloaded from the link below
https://www.corrensa.com/corrins/vtigercorrensa.zip
Save the extension on your local computer.
Install Extension for VTiger
To install the extension, you will need to:
- Login to VTiger CRM
- Go to right “Gear Icon” in the upper corner
- Click “CRM Settings”
- Next click “Module Manager”
- Scroll all the way down and click “Import from file”
- Select the extension and hit next.
- Accept terms & conditions and proceed with the setup.
Once the installation is complete – you will be presented with the popup indicating that.
Click here for instructions with screenshots
Create Corrensa Account
In order to use Corrensa plugin for Outlook/Gmail/Office 365 – you will be required to create a Corrensa account. To create an account:
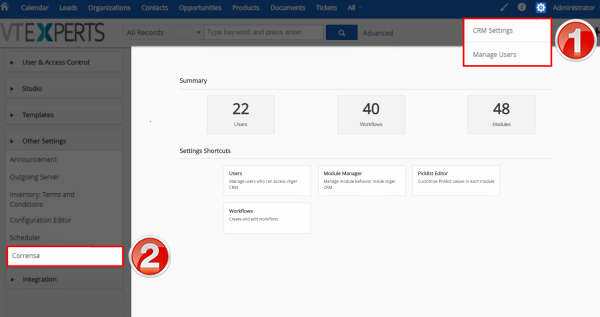
- Login to your VTiger
- Go to “CRM Settings” (upper right corner)
- Expand “Other Settings”
- Click on “Corrensa”
You will then have an option to create an account. Click the “Create Corrensa Account” and fill out all the details.
Configuration
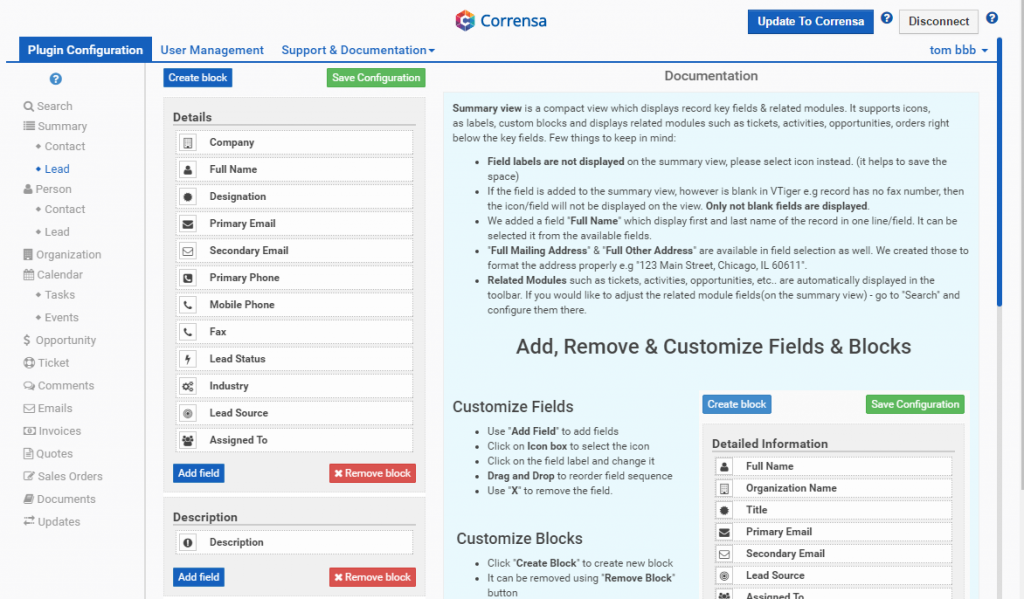
Plugin Configuration
Plugin Configuration is an area where the fields, blocks & layouts are configured. Once you login to the extension and click to “Plugin Configuration” – you will see the list of modules available to be configured and by clicking on each – you will be able to add/remove/rename fields, create/remove blocks & much more. The documentation ‘how to’ do all of that is inside the extension .
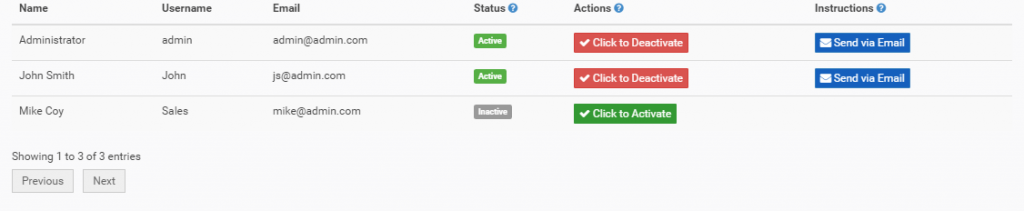
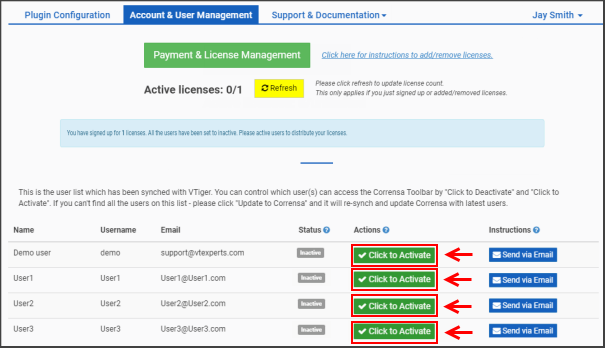
User Management
This is the user list which has been synched with VTiger. You can control which users can access the Corrensa Toolbar by “Click to Deactivate” and “Click to Activate”.
If can’t find all the users on this list – please click “Update to Corrensa” and it will re-synch and update Corrensa with latest users.
Status
“Active” – User has access to Corrensa Toolbar.
“Inactive” – User does not have access to Corrensa Toolbar
Actions
If you “Click to Deactivate” – it will set the user to “Inactive” and the user will no longer be able to access the toolbar.
If you “Click to Activate” – it will set the user to “Active”and send an email with instructions on how to download & install Outlook/Gmail/Office 365 Plugin.
Instructions
By clicking “Send via Email” you will trigger an email to the user with with instructions on how to download & install Outlook/Gmail/Office 365 Plugin.
Update to Corrensa
You have an option to push changes from the configuration to Corrensa toolbar manually. The way it works is – the configuration is stored on corrensa servers and you need to push that to toolbar. In 99% of the cases – all the changes are synched automatically to the toolbar and you will likely not going to need to use this.
The only reason you would use it if:
- You added new fields in VTiger and can find them in “Plugin Configuration”
- You added new picklist values and you can not see them in Outlook/Gmail/Office 365 Plugin
- You created new users in VTiger and don’t see them in “User Management”
Disconnect
Disconnect button will disconnect Corrensa toolbar from your VTiger instance. Once you do that, you will no longer be able to login to the toolbar in Outlook/Gmail/Office 365. Also, when you disconnect – it clears all the configuration(if any) you did in the “Plugin Configuration” section.
Again, the “Disconnect” button is used to disconnect account from VTiger. Possible reasons might be:
- Switching VTiger to another Corrensa Account
- Reinstalling/Refreshing Corrensa Configuration
- Removing/Disabling Corrensa Extension
Payment & License Management
Sign Up
Signing up with Corrensa is quick and easy! First, you need to go to your Corrensa configuration area
- Open your VTiger
- Then CRM Settings(upper right corner) > Other Settings > Corrensa
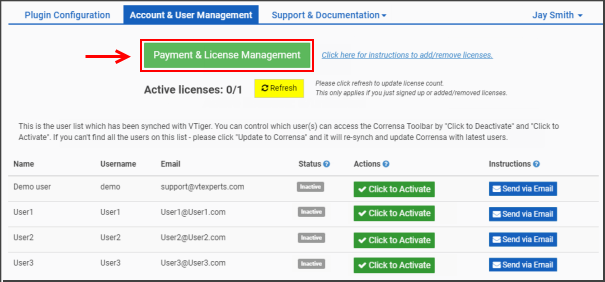
- Next, click on the “Account & User Management“
- You will then see a button “CLICK HERE TO SIGN UP“
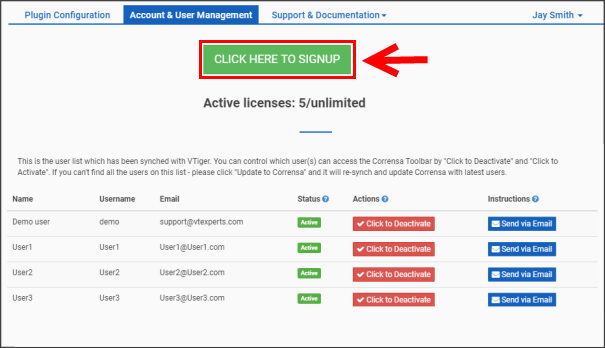
Once you click the button, the window will open up where your payment/billing information has to be put in. Few things to keep in mind:
- “Active Users” is automatically prefilled with the number of active VTiger users.
- NOTE: You can change the quantity, it is NOT required to purchase licenses for all users. If you have total of 10 users and only 5 of them will be using Corrensa – simply change the quantity to 5.
- Payment Methods: We accept Credit Cards and PayPal. You will see an option to select credit card or paypal on the “Billing Information” block. If you can’t find it – please click here for a screenshot.
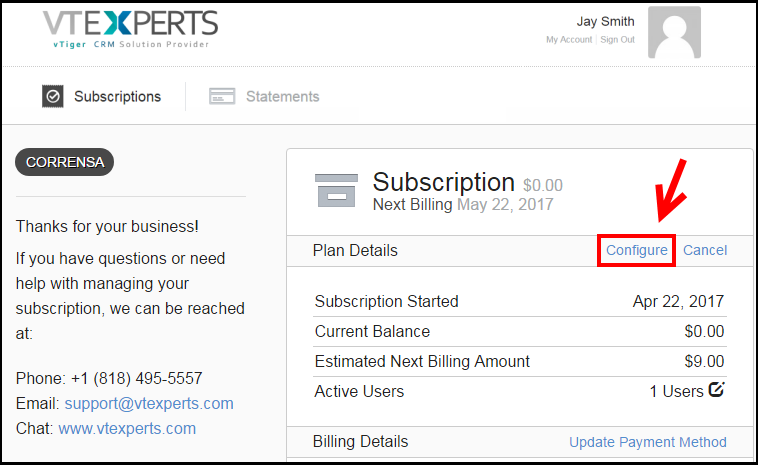
Once you put in billing information and the payment is successful – you will then be redirected to a another page and you will be required to refresh your VTiger page/browser window.
Finally, the “Active Licenses” will update and indicate how how many used/active licenses are available.
NOTE: As you sign up – all users will be set to Inactive and you will need to distribute the licenses manually. You will have to click “Click to Active” button to attach Corrensa license to each user. At any time you can deactive the user and attach the license to another user.
Add/Remove Licenses
At any time you can add or remove licenses from your subscription. To do so, you need to go to your Corrensa configuration area
- CRM Settings(upper right corner) > Other Settings > Corrensa
- Next, click on the “Account & User Management“
- You will then see a button Payment & Licenses Management
Once you click the button, a new page will open up where you will be able to add/remove users.
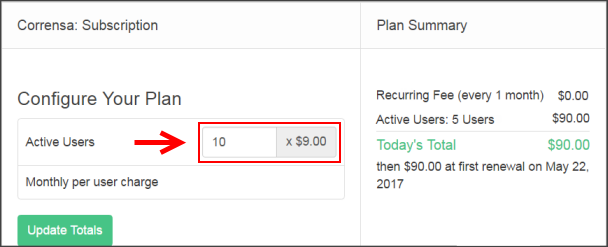
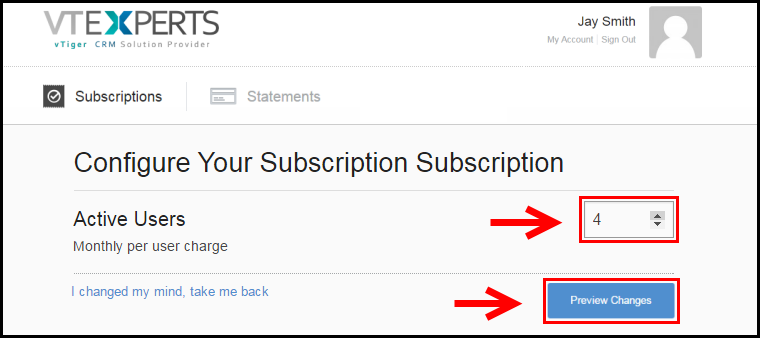
Next, click “Configure” and you will be able to change the quantity of active licenses.
Next, enter increase or decrease the “Active Users” by entering new quantity and hit “Preview” to view & confirm the updated charges.
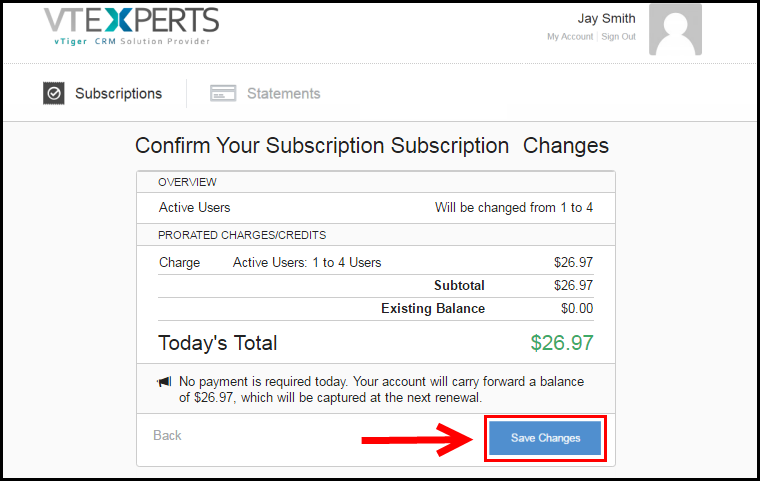
Finally, preview the changes and hit “Save Changes“. The changes will be saved and the prorated amount will be charged on the next billing cycle.
Once the change is made, you will then have to go back to your VTiger, click Refresh and “Active licenses” count will update. You will then be able to distribute your licenses by clicking “Click to Active“.
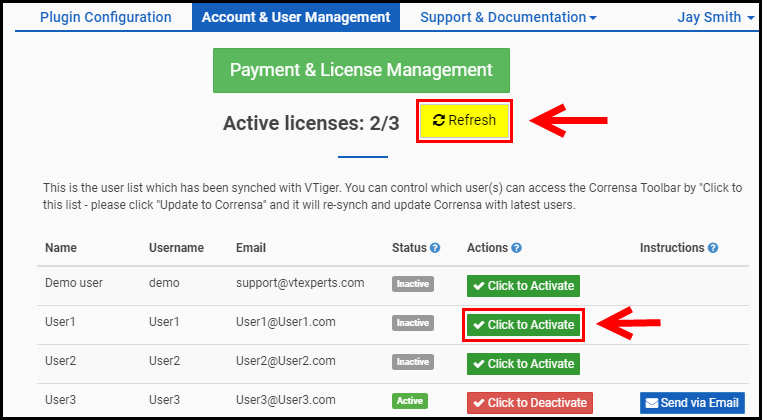
If you purchased additional licenses, you will then be able to use “Click to Active” and distribute new licenses.
If you downgraded your licenses – some of your users will be set to Inactive to accommodate license limit.
Download Invoice/Statement
In order to download the invoice/statement – you need to go to your Corrensa configuration area:
- CRM Settings(upper right corner) > Other Settings > Corrensa
- Next, click on the “Account & User Management“
- You will then see a button Payment & Licenses Management
Once you click the button, a new page will open up.
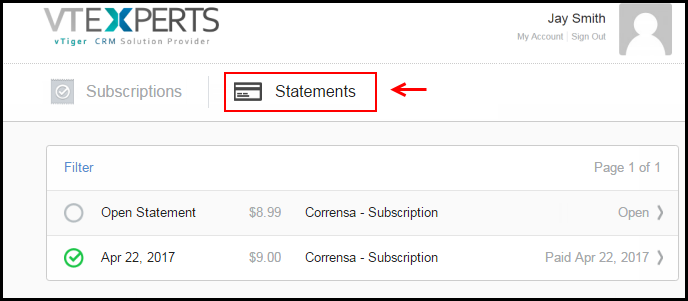
Next, click “Statements” and you will be able to see the history and download invoices as a PDFs.
Outlook/Gmail Plugin
Download Outlook Plugin
Detailed instructions on how to download & install Outlook Plugin are available below.
Link: https://www.corrensa.com/how-to-install-outlook-plugin-for-vtiger/
Download Gmail Plugin
Detailed instructions on how to download & install Gmail Plugin are available below.
Link: https://www.corrensa.com/how-to-install-gmail-extension-for-vtiger/
Download Office 365 Plugin
Detailed instructions on how to download & install Outlook Plugin are available below.
Link: https://www.corrensa.com/how-to-install-outlook-plugin-for-vtiger/
Support/Troubleshooting
Contact Us
We can be contacted via email, chat or phone. Our usual response time is 24-48 hours and we respond to every question, so please contact us as needed.
Email: [email protected]
Phone: +1 (818) 495-5557
Chat: ![]()
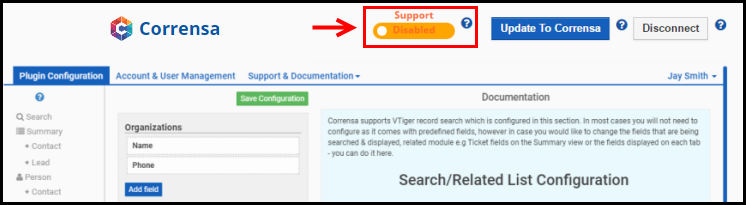
Enable/Disable Support
If you are having an issue with our plugin, in order to troubleshoot we will likely need to access your VTiger instance. The easiest way to do so – is for you to enable support.
If you click “Enable/Disable Support” button – a VTiger user ‘corrensaap’ will get automatically created and sent to our support staff. This will allow us our support technician to access and troubleshoot your issue/VTiger. At anytime, you can click to disable and the access will be revoked.
"Errors" Button
“Errors” button is to show if any requirements have been missed. If you are having any issues with the plugin, e.g documents are not attaching or can’t save/view record via plugin – please make sure all of the errors have been fixed or contact us. It is possible that the issue might not related to errors shown.
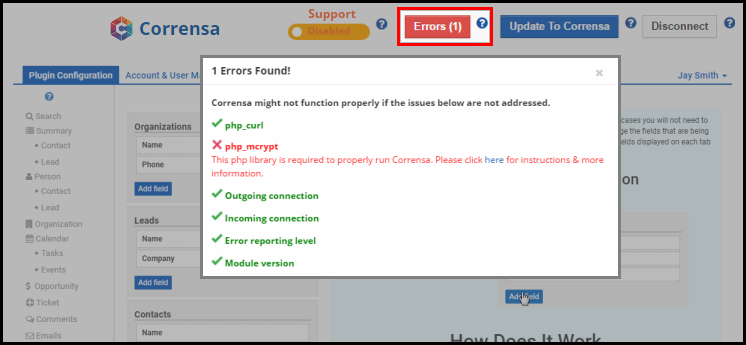
Here are the articles to help you with each requirement.
- Error reporting level: https://www.corrensa.com/proper-error-reporting-level/
- php-mcrypt: https://www.corrensa.com/how-to-enable-php-mcrypt/
- php-curl: https://www.corrensa.com/how-to-enable-php-curl/
- Incoming/Outgoing connection: https://www.corrensa.com/how-to-setup-corrensa-on-local-network-and-configure-firewall/
For any questions – feel free to contact us, we will provide support at no charge.
Please update to the latest version of the extension
If you are receiving a message “Please update to the latest version of the extension” is it likely that there was an update on our end and your extension needs to be upgraded as well.
Instructions: https://www.corrensa.com/please-update-latest-version-extension/
"Field" is Blank
There are few reasons that you might be getting this popup – for the possible cause and working solution, please refer to the article below:
Internal Network/Firewall
In order to use Corrensa – your VTiger server has to have access to the internet. If the server is behind the firewall – you could add a rule and allow incoming traffic from Corrensa servers.
If you have any questions or can’t get it to connect – please contact us, we’ll assist!
Authentication Failed
You may run into the “Authentication Failed” message when trying to log into Corrensa toolbar on Outlook, Gmail or Office 365. The possible issues are:
- Authentication Failed: Invalid VTiger Username or Password
- Authentication Failed: URL is unavailable
- Authentication Failed: User is not found
- Authentication Failed: User is not activated
We have separate article describing possible causes and solutions.
Link: https://www.corrensa.com/authentication-failed-troubleshooting/
Fatal error: curl_init
Corrensa requires php_curl installed/enabled on your server. If php_curl is not enabled – you will get the error below before you even get to sign up or login.
Fatal error: Call to undefined function curl_init() in
It’s a very common php extension and is fairly easy to install/enable(usually takes 1-2 minutes).
Error Codes
During the initial login/sync – you might get an error message below. Please contact us for more information.
- 1001 – B_SERVER_ERROR_CODE
- 1002 – DB_QUERY_ERROR
- 2001 – AUTH_FAILED
- 2002 – INVALID_SEARCH_PARAMS
- 2003 – INVALID_CREATE_PARAMS
- 2004 – UNDEFINED_ERROR
- 2005 – NOT_FOUND
- 2005 – SUMMARY_NOT_FOUND
- 2007 – THERE_IS_NO_LINKED
- 2008 – USER_IS_NOT_ACTIVATED
- 2009 – NOT_INSTALL_CORRENSA
- 2010 – CANNOT_CONNECT_VTIGER
Corrensa Lite (Free)
Download Extension for VTiger
First step is to download VTiger Extension. The extension can be downloaded from the link below
https://www.corrensa.com/corrins/vtigercorrensa-free.zip
Save the extension on your local computer.
Install Extension
To install the extension, you will need to:
- Login to VTiger CRM
- Go to right “Gear Icon” in the upper corner
- Click “CRM Settings”
- Next click “Module Manager”
- Scroll all the way down and click “Import from file”
- Select the extension and hit next.
- Accept terms & conditions and proceed with the setup.
Once the installation is complete – you will be presented with the popup indicating that.
Click here for instructions with screenshots
Download Gmail Plugin
Detailed instructions on how to download & install Free Gmail Plugin are available below.
Link: https://www.corrensa.com/how-to-install-free-gmail-extension-for-vtiger/
Download Outlook Plugin
Detailed instructions on how to download & install Free Outlook Plugin are available below.
Link: https://www.corrensa.com/how-to-install-free-outlook-plugin-for-vtiger/
Download Office 365 Plugin
Detailed instructions on how to download & install Free Office 365 Plugin are available below.
Link: https://www.corrensa.com/how-to-install-free-office-365-plugin-for-vtiger/